Team Configuration
What is 'Team Configuration' and how it works?
To organize and display metrics by team, Apache DevLake needs to know about the team configuration in an organization, specifically:
- What are the teams?
- Who are the users(unified identities)?
- Which users belong to a team?
- Which accounts(identities in specific tools) belong to the same user?
Each of the questions above corresponds to a table in DevLake's schema, illustrated below:
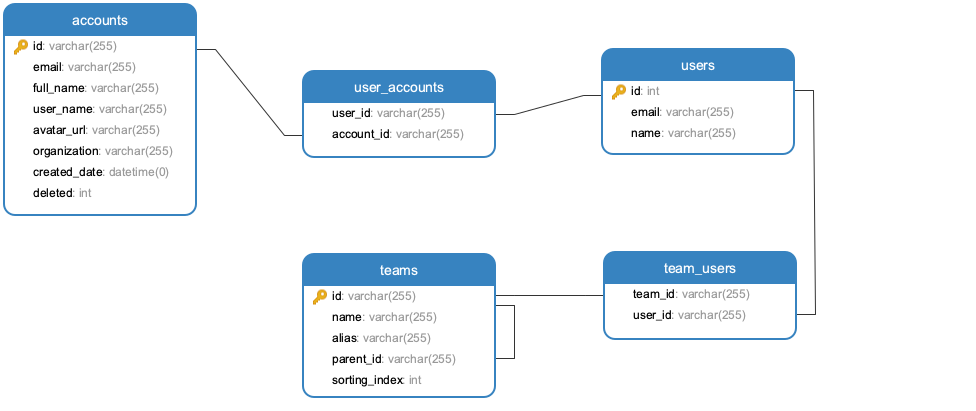
teamstable stores all the teams in the organization.userstable stores the organization's roster. An entry in theuserstable corresponds to a person in the org.team_userstable stores which users belong to a team.user_accountstable stores which accounts belong to a user. Anaccountrefers to an identiy in a DevOps tool and is automatically created when importing data from that tool. For example, ausermay have a GitHubaccountas well as a Jiraaccount.
Apache DevLake uses a simple heuristic algorithm based on emails and names to automatically map accounts to users and populate the user_accounts table.
When Apache DevLake cannot confidently map an account to a user due to insufficient information, it allows DevLake users to manually configure the mapping to ensure accuracy and integrity.
A step-by-step guide
In the following sections, we'll walk through how to configure teams and create the five aforementioned tables (teams, users, team_users, accounts, and user_accounts).
The overall workflow is:
- Create the
teamstable - Create the
usersandteam_userstable - Populate the
accountstable via data collection - Run a heuristic algorithm to populate
user_accountstable - Manually update
user_accountswhen the algorithm can't catch everything
- Please replace
/path/to/*.csvwith the absolute path of the CSV file you'd like to upload. - Please replace
http://127.0.0.1:4000with your actual Config UI service IP and port number. If you have enabled HTTPS, please replace it accordingly. - Please create your API key on the
API Keyspage instead of using the automatically generated key from the webhook creation.
Step 1 - Create the teams table
You can create the teams table by sending a PUT request to /plugins/org/teams.csv with a teams.csv file. To jumpstart the process, you can download a template teams.csv from /plugins/org/teams.csv?fake_data=true. Below are the detailed instructions:
Download the template
teams.csvfile. You can do it bya. Pasting the URL into your browser to download the template.
http://127.0.0.1:4000/api/plugins/org/teams.csv?fake_data=trueb. Or using CURL:
curl 'http://127.0.0.1:4000/api/rest/plugins/org/teams.csv?fake_data=true' -X 'GET' -H 'Authorization: Bearer {API_key}'Fill out
teams.csvfile and upload it to DevLake (If you are using Excel to modify the CSV file, please save it with UTF-8 encoding. See how)a. Fill out
teams.csvwith your org data. Please don't modify the column headers or the file suffix.b. Upload
teams.csvto DevLake with the following curl commandcurl 'http://127.0.0.1:4000/api/rest/plugins/org/teams.csv' -X 'PUT' -H 'Authorization: Bearer {API_key}' --form 'file=@"/path/to/teams.csv"'c. The PUT request would populate the
teamstable with data fromteams.csvfile. You can connect to the database and verify the data in theteamstable. See 'Appendix A' for how to connect to the database.
Step 2 - Create the users and team_users table
You can create the users and team_users table by sending a single PUT request to /plugins/org/users.csv with a users.csv file. To jumpstart the process, you can download a template users.csv from /plugins/org/users.csv?fake_data=true. Below are the detailed instructions:
Download the template
users.csvfile. You can do it bya. Pasting the URL into your browser to download the template.
http://127.0.0.1:4000/api/plugins/org/users.csv?fake_data=trueb. Or using CURL:
curl 'http://127.0.0.1:4000/api/rest/plugins/org/users.csv?fake_data=true' -X 'GET' -H 'Authorization: Bearer {API_key}'Fill out
users.csvand upload it to DevLake (If you are using Excel to modify the CSV file, please save it with UTF-8 encoding. See how)a. Fill out
users.csvwith your org data. Please do not modify the column headers or the file suffix.b. Upload
users.csvto DevLake with the following curl command:curl 'http://127.0.0.1:4000/api/rest/plugins/org/users.csv' -X 'PUT' -H 'Authorization: Bearer {API_key}' --form 'file=@"/path/to/users.csv"'c. The PUT request would populate the
userstable along with theteam_userstable with data fromusers.csvfile. You can connect to the database and verify these two tables.

If you want to update
team_usersoruserstable, simply upload the updatedusers.csvto DevLake again following the previous step.
Step 3 - Populate the accounts table via data collection
The accounts table is automatically populated when you collect data from data sources like GitHub and Jira through DevLake.
For example, the GitHub plugin would create one entry in the accounts table for each GitHub user involved in your repository. For demo purposes, we will insert some mock data into the accounts table using SQL:
INSERT INTO `accounts` (`id`, `created_at`, `updated_at`, `_raw_data_params`, `_raw_data_table`, `_raw_data_id`, `_raw_data_remark`, `email`, `full_name`, `user_name`, `avatar_url`, `organization`, `created_date`, `status`)
VALUES
        ('github:GithubAccount:1:1234', '2022-07-12 10:54:09.632', '2022-07-12 10:54:09.632', '{\"ConnectionId\":1,\"Owner\":\"apache\",\"Repo\":\"incubator-devlake\"}', '_raw_github_api_pull_request_reviews', 28, '', 'TyroneKCummings@teleworm.us', '', 'Tyrone K. Cummings', 'https://avatars.githubusercontent.com/u/101256042?u=a6e460fbaffce7514cbd65ac739a985f5158dabc&v=4', '', NULL, 0),
        ('jira:JiraAccount:1:629cdf', '2022-07-12 10:54:09.632', '2022-07-12 10:54:09.632', '{\"ConnectionId\":1,\"BoardId\":\"76\"}', '_raw_jira_api_users', 5, '', 'DorothyRUpdegraff@dayrep.com', '', 'Dorothy R. Updegraff', 'https://avatars.jiraxxxx158dabc&v=4', '', NULL, 0);

Step 4 - Run a heuristic algorithm to populate user_accounts table
Now that we have data in both the users and accounts table, we can tell DevLake to infer the mappings between users and accounts with a simple heuristic algorithm based on names and emails.
Send an API request to DevLake to run the mapping algorithm
curl --location --request POST '127.0.0.1:4000/api/pipelines' \
--header 'Content-Type: application/json' \
--data-raw '{
    "name": "test",
    "plan":[
        [
            {
                "plugin": "org",
                "subtasks":["connectUserAccountsExact"]
            }
        ]
    ]
}'
After successful execution, you can verify the data in
user_accountsin the database.
Step 5 - Manually update user_accounts when the algorithm can't catch everything
It is recommended to examine the generated user_accounts table after running the algorithm. We will demonstrate how to manually update user_accounts when the mapping is inaccurate or incomplete in this section.
To make manual verification easier, DevLake provides an API for users to download user_accounts as a CSV file. Alternatively, you can verify and modify user_accounts all by SQL, see Appendix for more info.
Download the template by pasting the following URL to your browser:
http://127.0.0.1:4000/api/plugins/org/user_account_mapping.csvb. Or using CURL:
curl 'http://127.0.0.1:4000/api/rest/plugins/org/user_account_mapping.csv' -X 'GET' -H 'Authorization: Bearer {API_key}'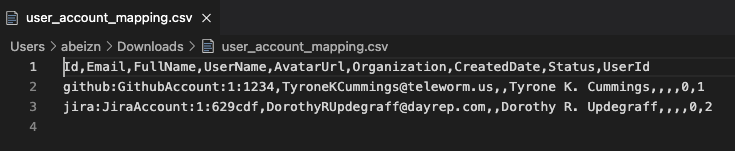
If you find the mapping inaccurate or incomplete, you can modify the
user_account_mapping.csvfile and then upload it to DevLake. For example, here we change theUserIdof row 'Id=github:GithubAccount:1:1234' in theuser_account_mapping.csvfile to 2.Save and upload the updated
user_account_mapping.csvfile with the following curl command (If you are using Excel to modify the CSV file, please save it with UTF-8 encoding. See how):curl 'http://127.0.0.1:4000/api/rest/plugins/org/user_account_mapping.csv' -X 'PUT' -H 'Authorization: Bearer {API_key}' --form 'file=@"/path/to/user_account_mapping.csv"'You can verify the data in the
user_accountstable has been updated.

Appendix A: how to connect to the database
There are many ways to connect to the database:
- Through Grafana. Go to Grafana's Explore page. Switch the SQL editor to the code mode. Then, you can write SQL to describe database and query data.
- Through database management tools such as Navicat, phyMyAdmin, DataGrip, MySQLWorkbench, etc. Type in your host, port, username and password to connect to the DB. The username and password can be fount in the image or .env file.
- Through the command line. Take MySQL as an example:
mysql -h <ip> -u <username> -p -P <port>
Appendix B: how to examine user_accounts via SQL
SELECT a.id as account_id, a.email, a.user_name as account_user_name, u.id as user_id, u.name as real_name
FROM accounts a
        join user_accounts ua on a.id = ua.account_id
        join users u on ua.user_id = u.id
Troubleshooting
If you run into any problem, please check the Troubleshooting or create an issue